Posts

Showing posts from April, 2020
Image
Double Gatefold Card Class In this weeks card class we will be making these gatefold cards.  We're using the pressed petals designer series papers.  You will need 12 x 12 paper ( I used f4resh fig and morning meadow) cut to the card base at 5.5 inches x 12 inches and an additional piece at 1in x 8.5 inches  Patterned paper(pressed petals) with 4 pieces at 1.75 inches x 5.25inches and 1 piece at 3.75 x 5.25 inches  To make the card base score at 2,4,8 and 10 inches as shown below  After folding glue on your patterned papers.  TO make the belly band score at 2 and 4 1/8 inches. FOld and adhere the 2 ends together. Then finish off with your chosen die cuts.  Happy Crafting 
Image
ONE SHEET WONDER On-Line Class  We're into our fourth week of on lien classes and it's so nice to see familiar faces, have a catch up and for everyone to show each other what they have been working on.  This week I am going to demonstrate one sheet wonder cards.. This is where you use different templates to cut a sheet of 6 x 6 inch paper into smaller sections and make lots of cards using them. Stampin Up's designer series paper is always so beautiful that a little bit does go a long way.  I have a some ladies joining us who are using their own stash so this list and photo helps them see what supplies to have prepared.  I have made cards using template one. I cut the DSP first and then usually cut a mat of plain cardstock that is 1/4 of an inch larger on each side.  Here is the template for the set of 4 cards - apologies for the pink ink - I forgot to move my templates before adding ink to my embossed cardstock. Whoops but it's past midnight so I ne
Image
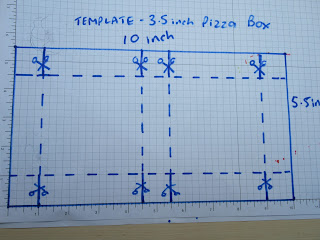
Mini Pizza Box filled with 3in cards - Online Class  In this week's class we are using a Stampin' Up! pizza box and making 5 mini cards to go inside. I've made these before in class and they are very popular. THe Pizza box is ready assembled and is great for food gifts as it is totally food safe.  I will also be showing how to make your own box from a sheet of card.  Here's a brief photo tutorial  To make a box from scratch  1) Cut your paper to 10 inches by 5.5 inches.  On the short side score at 1 in and 4.5 inches On the long side score at 1inch, 4.5 inches, 5.5 inches, 9 inches.  2) Snip the  edges as shown, I make a little indent so that the box folds more easily.  Always make sure you are taking this indent from the edge that will fold into the box.  3) fold the edges in and glue where I have marked with a G then assemble box.  4- Cut paper to decorate box. Cardstock mat for top of box  is 3 1/4 in x 3 1/4 in a

Gatefold Zig Zag Cards - Online Class 8th April

Image
Gatefold Zig Zag Cards - Online Class 8th April We'll be making these cards in our on line Zoom class tomorrow/  I', expecting a few new crafters to join us as people are pleased to have the opportunity for some virtual company while we are in lockdown,  TO join in you will need a paper trimmer a score board  1 piece 5.5inch x 12 inch double sided papers  I piece whisper white cardstock for insert 5inch x 3 inch  a selection of punched or die cut shapes for your greeting  tombow glue or tear and tape.  To make the card base on the long side score at 2 4 8 and 10 inches  follow the picture below to see how to make the diagonal cut on the front of the card.  reverse the paper and glue in place add your insert and your greeting 
Image
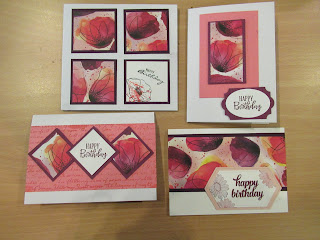
Painted Poppies - Facebook Live Cards   Here are the cards I made on yesterday's Facebook live. I've added a photo listing the card sizes I used and also a couple of photos showing how I got the stamps in a straight line and how to punch out the section that becomes raised. Hope everyone  is keeping safe and doing lots of crafting to pass the time.