Posts

Showing posts from 2020

Online Class - Making Vellum Cards

Image
Thursday 16th July Today I'll be demonstrating how to make these pretty cards using vellum as a base. 1) Cut your A4 vellum to 10cm wide \nd then score along the long side at 14.9cm , 2) Cut 4 pieces of DSP to 10 cm wide x 7.5 cm long.  Take 2 pieces of paper, put the sides you do not want showing together and trim on the diagonal. TIP - make sure your paper is facing the correct way.   3) Stick the paper to the bottom of the front and back of the card and then add the insides making sure everything aligns nicely. 4) Decorate as required - I have used The Forever Greenery Bundle for the papers and die cuts. 
Squash Cards

Image
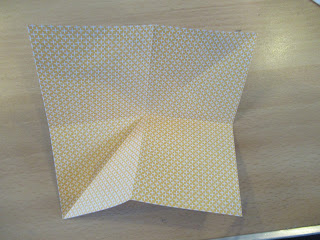
Zoom class for 17th June At this class we will be making a squash book card - this can be used as a mini little book and you can lots of details to it. Very simple to make you need 3 pieces of 6 inch x 6 inch double sided paper and a scorer.  It's best to use non directional patterned paper. Score each piece of paper in half(3 inches) both horizontally and vertically. Then score diagonally across the paper  on just one diagonnal.  The photo below shows what your scoring should look like. Then lay all the scored pieces of paper out ready to glue together.  When applying glue make sure not to go over the score lines or your card will not fold properly . Once glued you fold the edges in and the whole card squashes up to be just 3 x 3 inches. Then it's time to make the closure using ribbon or twine under a die/punch cut circle.

Memo Block Holder

Image
On line Zoom Class Wednesday 3rd June Here are the instructions for attendees to use during the class, using the kit provided. For the main part of the box you need some fairly sturdy 12 x 12 inch cardstock and I have made use of the backing card sheet that comes in Stampin Up packs of Designer Series paper - it's always good to use everything you can.  Make sure that the writing is on the inside when you assemble the box of course and it will all be hidden.  You will need  12 x 12 strong card  DSP and co-ordinating cardstock to match - here I used magnolia lane and the (now retired hot air balloon punch and the magnolia dies for the flowers.  These measurements are for a 9cm square memo block.  1) Trim your sturdy cardstock to 11 3/4 in ch x 11 3/4 inch.  2) Score at 2inch, 4 inch , 7 3/4inch and 9 3/4 inch on both the horizontal and vertical. The picture below show the score lines as dotted lines. 3) Cut out the ar...

Flower Pot Cards

Image
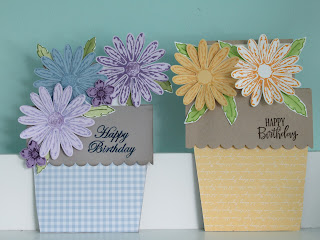
This week we are making flower pot cards using the soon to retire daisy delight stamp set and matching punch To make the card you need  A4 cardstock a 4in x 6 in piece of co ordinating designer series paper Cut your cardstock to 11inch x 3 inch and score at 4 1/2 inches and 9 inches on the long side. Make a pretty border on the 2 inch section using either a punch or edging die. Mark 1/2 in in from the bottom of the cardstock on both sides and cut to the top of the card to make the flower pot shape Glue patterned paper to the front of your card and then trim. Stamp a greeting if required on the edge.  Then use tear and tape or glue to secure the plant pot edge down. Use tear and tape to join the card at the top Make the insert - a 5.5 inch x 3inch piece with a neutral layer measuring 5 1.4 inch x 2 3.4 inch on top, This will be decorated at the top

Mini Envelope Album

Image
On Line Class Wednesday 13th May  The top photo shows the completed album closed. I've used the Free as a bird stamp set and co-ordinating bird ballad papers.  The photos below show the open album and pages although I have not yet completely finished decorating this as I haven't decided who is it for and what photos and momentos I will add.    What you need to complete the project ( all supplied for those who pre purchased kits from me)  3 envelopes 5.25 x 5 .25 inches  selection of matching cardstock to cover envelope base 6 pieces at 5 inch x 5 inch  3 whisper white inserts cut to 4.75 x 4.75 inches  2 matching pieces of patterned paper cut at 2 inches x 5.25 inches ( these are to cover both sides of the envelope flap that becomes the closure  matching papers, stamps, ribbon for your choice of embellishment.  1) Score each envelope 3.8 inch above the fold line  2) Apply glue...

Handbag Gift Bag with Notelets.

Image
In this week's pnline class we are making these very pretty little handbags which contain 5 notecards. A great gift to give to a friend or family member who may need to send out some thank you cards or RAK ( random act of kindness) during the current lockdown. I've used the Best Dressed papers here along with daisy lane and daisy delight stamp sets with the large daisy punch. To make the handbag you need - a sheet of A4 cut to 11cm x 29.5cm and 2 pieces for handles cut to 1.2 cm x 8cm - co-ordinating cardstock 2 pieces cut to 6cm x 13 cm - co-ordinating designer series paper - 2 pieces cut to 5cm x 13cm 4 mini brads and small punch for decoration around the brads, Score the 11cm x 29,5 cm piece of cardstock  at 1 cm on the short side  at 13cm, 14cm, 27cm, and 28cm on the long side. Using a pencil mark the points for your brads and make the hole using a poky took or 1/16th hole punch. .  Fold and make crisp scores using your ...
Image
Double Gatefold Card Class In this weeks card class we will be making these gatefold cards.  We're using the pressed petals designer series papers.  You will need 12 x 12 paper ( I used f4resh fig and morning meadow) cut to the card base at 5.5 inches x 12 inches and an additional piece at 1in x 8.5 inches  Patterned paper(pressed petals) with 4 pieces at 1.75 inches x 5.25inches and 1 piece at 3.75 x 5.25 inches  To make the card base score at 2,4,8 and 10 inches as shown below  After folding glue on your patterned papers.  TO make the belly band score at 2 and 4 1/8 inches. FOld and adhere the 2 ends together. Then finish off with your chosen die cuts.  Happy Crafting 
Image
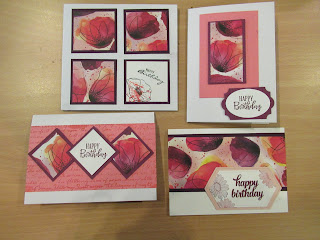
ONE SHEET WONDER On-Line Class  We're into our fourth week of on lien classes and it's so nice to see familiar faces, have a catch up and for everyone to show each other what they have been working on.  This week I am going to demonstrate one sheet wonder cards.. This is where you use different templates to cut a sheet of 6 x 6 inch paper into smaller sections and make lots of cards using them. Stampin Up's designer series paper is always so beautiful that a little bit does go a long way.  I have a some ladies joining us who are using their own stash so this list and photo helps them see what supplies to have prepared.  I have made cards using template one. I cut the DSP first and then usually cut a mat of plain cardstock that is 1/4 of an inch larger on each side.  Here is the template for the set of 4 cards - apologies for the pink ink - I forgot to move my templates before adding ink to my embossed cardstock. Whoops but it's past midnight...